Mini Easel Advent Hello everyone, it's Saturday and I am glad that you found your way to us ... Today, I have a mix of mini-guides for you, which fit together into a cute little gift for a loved one:) ***
Hello dear friends, it's saturday and I'm happy to see you here ... today I have a mix of mini tutorials for you, Which Will make a cute little gift for someone special:) I love Christmas and especially Christmas and there is of course also an advent calendar this:) Better than chocolate, of course, a few little things that warm the heart and hobbyist so I have done it last year for two very dear friends advent calendar. And since I last November, the Easel Cards just so much joy already, I have summarily connected with my calendars.
***
I love Christmas and especially the pre-christmas time in december. And I love Advent calendars:) Better than chocolate is a bunch of little goodies for crafting, so I made mini advent calendars last year for 2 lovely friends of mine. And because last year in november I've loved to make easel cards, I combined these with my calendars. Soon It that time again, so I want to show you today, my mini-calendar. I think a great guide for the calendar to your need not, therefore, I take myself in short:) ***
The time for advent calendars is almost here, so I'd like to show you my mini calendars . I think you all know how to make searchable calendars, so I will make it short:) I more like to make as a calendar, I have bought ready-match boxes, rather than after the great
Tutorial by Susan itself . make I'll summarize in 3 packs and fix it with tape. There are different ways to build them, I am showing two of them ...
***
Because I want to make more than one calendar, I bought some match boxes instead making them myself following the great tutorial by Susan . I 3 adhere boxes together with tape. There are many possibilites to build the calendar, I'll show you 2 ... 

The view from above is the same for both versions ...
***
They look simular from above ... 
I fix everything again with adhesive tape so that the calendar is stable, and design the visible sides with paper.
***
I adhere everything again with tape to Stabilise the calendar and put Designer Papers at the pieces visible on the side. 
This size fits perfectly for the Spellbinders Nestabilities labels 1, but you can try of course any other and just make a square. I have recorded the outer perimeter of the largest shapes on solid cardboard twice, cut out and attached top and bottom of my calendar.
***
For these boxes the Nestabilities Spellbinders Labels 1 perfect fit, but you can also try with everything else or make it square. I drawn the outer line of the biggest label shape 2 times on cardstock, cut it out and adhere at the top and the bottom of my calendar. 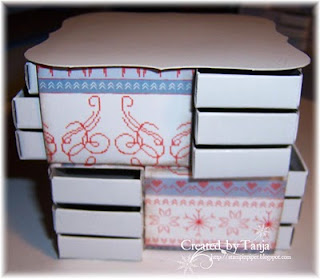

for a suitable Easel Card, which you can stick on your top, you make the same shape that you've just taken for recording, a map, as you can see it in
JayJays instructions for Spellbinders mini cards. Moreover, the whole is again simply punched out of cardboard.
***
Easel For the matching card you have to make a card following the tutorial by JayJay in the same size you choosed for the top and bottom. You also have to cut one single piece of card stock with this shape. 
For Easel Card is the folding map now folded as in the picture is seen.
***
To make the easel card you have to fold the card as you can see on the picture. 
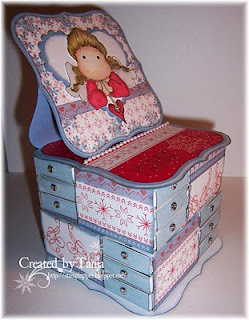
The single piece of cardstock is glued to the folded piece, and start decorating ...
***
Now you have to adhere the single piece of card stock onto the folded piece of the card and you can begin to decorate ... to 
To have a piece of paper just smaller than the card, I have
the inside of the amnesty on my paper cut out and drawn . The boxes I've colored with Distress Ink. For the small drawers There are various possibilities. You can take Brad as "handles", beads, a band with nodes ... I have chosen this year for brads and beads, but still the numbers are missing on each box;)
This Calendar "series" I have now finished ...
***
To get a paper a bit smaller than the card, I've drawn the inside of the Nestabilities on paper and cutted it out. I've colored the boxes with distress ink. T here a several possibilities to open the boxes, you can use brads, pearls, knotted a ribbon ... I choosed Brads and Pearls this year, the only thing missing are the numbers on the boxes;)
This is my calendar "series" 


These are my calendar from last year ...
***
The calendars are ths I made last year ... 


I hope you liked my post and maybe you can even make a loved one a little treat ...
***
I hope you liked my calendars and perhaps you'll make someone happy with such a gift ... I wish you a nice weekend, Your Tanya


 On can participate in the draw her to 24/12/2010!


