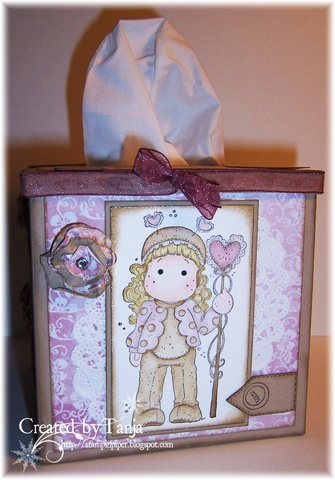
Guys, it's another week gone and Saturday, that is, time for a new edition of Stempeleinmaleins. Certainly you have in the past few weeks already discovered a number of Kosmetik-/Taschentuch box covers in the www, the idea by my dear colleague, DT Diane Zechman (also known as * cookie stamper *) from USA and she is our guest today !
***
***
Yay, it's weekend and Saturday again so it's time for another issue of Stempeleinmaleins. I'm sure that you saw a lot of tissue boxes in the www during the last weeks. The idea came from my dear mate DT Diane Zechman (also known as * cookie stamper *) from the U.S. and she is our guest today!

The instructions for the Kosmetiktuch-/Taschentuch Box Cover has filmed Diane. These instructions are in English of course, but even those who understand no English, will see from the film is so powerful as a cover. Have fun watching!
***
The tissue box cover tutorial is a video tutorial. Of course it's in English but even if you do not understand English you will see how to make a cover. Have fun watching this little film! (Most of the rest of the posting is in German because the video and pics are telling English speaking stampers everything that they need to know about the cover).
The tissue box cover tutorial is a video tutorial. Of course it's in English but even if you do not understand English you will see how to make a cover. Have fun watching this little film! (Most of the rest of the posting is in German because the video and pics are telling English speaking stampers everything that they need to know about the cover).
What you need:
Kosmetik-/Taschentuch box (the size can vary from Diane's box!)
Falzbrett
punching machine
punching templates
embossing folders
scissors
liquid adhesive
any ink pad and sponge
cardstock (all the measurements depend on the size of your box!)
you will need the following blanks for your box:
2x side
1x lid
4x decorative side panels (each 3-5mm shorter than the individual ends)
4x decorative strips (each 3-5mm shorter than the individual cap ends)
1x cover the upper part (each 3-5mm shorter than the surface of the lid) and summarized again in a few words


base: Start with 2 pieces of cardstock in size 13, 2 cm x 24,13 cm. (I have a used Kleenex box, measure from your box and change the size depending on how they fit with you). The folds long sides each at 1.27 cm and 12.7 cm (if your boxes have different dimensions, use the average fold to fold your own level). Bonds a part of one side part to part b of the second side part and repeated it (see video).

cover: Starts with a piece of cardstock slightly larger than 16.51 cm x 16.51 (cm if your box has different dimensions, then you must also modify the dimensions (2.54 cm + size of your box + 2.54 cm). rebated each of the pages each at 2.54 cm. In the drawn red lines you make a cut, the folds in her black lines. Punch a hole in the upper Page, or cut a shape by hand. Paste the cover now working on the tabs (X). Then she stuck to the cover (see video) and then decorated the box with papers, stamp designs and embellishments.

The size of the upper opening of the Kosmetik-/Taschentuch Box may differ from Diane's box. Once you have the oval punched in the lid, is still on it at the top of a layer of cardstock, whatever their stamping out the actual opening. Keep your best before cutting stencils on the first hole, to see which punch template in size is really suited for!

Dekoseitenteile Instead of embossed paper you can also design to take stamped, printed paper, or simply what you is now. Give it a try, the covers are a wonderful gift idea - not only for colds.
A few idea suggestions for you:
***
Ans here are some more ideas for you:


0 comments:
Post a Comment